A CSS file looks typically like this:
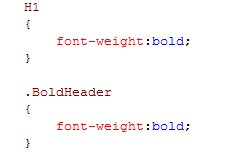
The first notation (H1) is called a Default Style. This is because all the elements with in <h1> tag would be rendered as BOLD.
The second notation (.BoldHeader) is called a Named Style. "Named", as the set of styles have a name. The phrase (word, actually) after the "." is the name given to the style. And any controls (oops! elements, I mean :-)) referring to this name would be rendered as BOLD.
I would not go in-depth, explaining the how-to about implementing themes and skins using CSS, as there are a plethora of articles in the internet.
There is a very interesting article, by Claus Augusti, about implementing Themes using CSS and Javascript. Read on!
Now, lets dive into ASP.NET 2.0. What's different in here? Here we have a .skin file (a file with .skin extension (duh!)), which defines the appearances of the controls that are used in a web page. A .skin file would "look" like an ASPX page. Like this, I mean:

-Label.skin file-
As you see, there is no ID property in the label control. Yes, that is the only difference!
NOTE: There is no intellisense support for .skin files. So, if you need to get it done fast, you need to type it in on an ASPX page and then copy/paste into the .skin file.
Then, when you create an ASPX page, mention this theme (ControlsTheme, as you see in the above snapshot).

-An ASPX page-
So, all the labels in the page would appear as specified in the Label.skin file.
You got the gist, right?
As I posted earlier, I am speaking about the Themes and Skins in ASP.NET 2.0 in our local .NET User Group (Central Penn .NET User Group) meeting on March 21.

No comments:
Post a Comment